Text may contain bad spelling, incorrect expressions, verbal turns, sentence constructions, etc.
Changelog
20 Jul. 2026
- Update: Additional information about TPM
- Added:
About AI.
Yes, I used AI, and no, AI did not write this text.
This text was written entirely by me, from start to finish.
AI was used to search for and verify information, as well as to write scripts. But with one key distinction – I understand what I’m doing (well, most), rather than mindlessly copying and pasting.
This is NOT compilation of information, it’s exactly what I did myself.
This is a pretty complex topic, and making it work for everyone… I don’t know how.
What you’re about to read is one particular path, one, but I’ve walked through dozens of them, tried A LOT of stuff. So you’ll need at least some basic knowledge, which is what all of this is about.
This is a long text, full of commands and scripts. I did all of this while writing and describing it at the same time, and it took more than one day.
If you find a mistake here, or something doesn’t work for you even though it DEFINITELY should – contact me.
If you run into issues with the XML, here’s my full XML file for reference.
Different hardware (not covered here), a different distro, a different environment/WM, something else entirely different — that’s not a reason to text me. Although… I might take a look.
Foreword
In this text I’ll show how I set up KVM on Linux openSUSE Tumbleweed from start to finish + extra Quality-of-Life features. The main thing here is, of course, passthrough and/or efficient use of:
- SSD
- GPU
- CPU
- RAM
Right from the start, keep in mind I have both an iGPU and a dGPU, and this text was written specifically for that scenario. If you don’t have two GPUs, iGPU + dGPU or dGPU + dGPU, this text isn’t for you. And in that case it’s worth reading only for general knowledge and the scripts.
It’s also important to mention: if you’re reading this with a clear intention and desire to do it, you’re probably mentally ready for it, and you have the hardware. Weak hardware will obviously not be great, but technically speaking, in this particular case, what matters isn’t raw power but quantity – lots of RAM, cores, and ideally a separate disk.
NOT having a second GPU is not covered in this text, that’s a completely different approach, because with ONE GPU you “use” EITHER the host OR the guest, while this text is built around using both, at the same time.
So. I chose openSUSE Tumbleweed + KDE Plasma. Why? We need the newest releases of everything – a rolling-release scheme, in order to pull off this trick with a VM running at 1:1 performance compared to bare metal. Debian and other LTS distros don’t really fit the bill.
The obvious option is Arch. A developer pushes a software update – you install it, done. But because of this Arch often breaks, and you have to keep an eye on the news feed of updates to check “is my system going to break after this update, and what do I need to do manually” – for me, not cool.
There’s Void, which is like Arch except updates are automatically tested, so the chance of the system breaking after an update is much lower. But Void uses runit instead of systemd, which for some people is a plus, but systemd is mega-popular, everything is built around it, do you really need this? And also, most of it is old stuff there, anything new you have to build by hand.
And the third option — openSUSE Tumbleweed, which is like Void, but with systemd and the newest software, plus a built-in YaST GUI application through which you can configure the system and set up a VM literally in one click.
As for KDE Plasma, At the time of writing this text, only KDE Plasma properly supports 4K HDR 320 Hz, or something like that. because it’s the most feature-packed and simple. For now + for testing purposes – it’s just right.
And absolutely everything will be described, said, and shown in the context of Tumbleweed and KDE Plasma. Because if you have a different distro/DE/WM and you have no clue about Linux whatsoever and have never f*cked around with this miracle – don’t do this, at least not on your working OS.
But if you do know what you’re doing, and you’re NOT on KDE Plasma OR you’re exclusively interested in cold dGPU passthrough – read this.
Introduction
About monitors
Think about how you’re going to look at Windows. There’s Looking Glass, of course, and I’ll even show how to set it up, but for games, especially action games, it’s terrible + it adds dGPU overhead. In my case, 2 monitors (both FULLHD):
Host:
- Primary – HDMI 1.4
- Secondary – DP
Guest:
- Primary – DP
- Secondary – HDMI 1.4
So it’s a crossed connection, and that’s because of a lack of inputs, both on the monitors and on the motherboard – if it were up to me, I’d plug everything into DP.
I mentioned the HDMI version for a reason, mine is 1.4, and that’s a max of 120 Hz (albeit via software), while my primary monitor is 144 Hz.
Logic #1, as simple and logical as it gets: make the host’s primary monitor DP, in work I’ll see the full 144 Hz, but I highly doubt games will actually give me 144 FPS, so HDMI at 120 Hz for the guest.
That’s exactly what I did at first, forgetting that NVIDIA doesn’t work with FreeSync, G-Sync, and other Sync tech over HDMI <2.1, and even then it’s janky, as far as I know.
So, Logic #2: the other way around – the host isn’t as smooth, yes, but the difference between 120 vs 144 isn’t that noticeable, unlike say 60 vs 75, and meanwhile all the Sync stuff works with NVIDIA over DP.
In the BIOS, aka UEFI Firmware, you obviously need to enable hardware virtualization for your CPU and enable IOMMU. How to do this – google it for your specific processor and motherboard manufacturer, everyone’s setup is different here.
Also enable IOMMU in the OS (this does not replace the BIOS settings):
YaST –> System –> Boot Loader, add to the end: amd_iommu=force_isolation iommu=pt. If you have Intel, then instead of amd_iommu=force_isolation –> intel_iommu=on.
Reboot.
Check the parameters and whether IOMMU is enabled:
sudo sh -c 'dmesg | grep -i iommu && echo && dmesg | grep -E "Intel-IOMMU|AMD-Vi"'
You can check whether you won the lottery like this:
sh -c 'for g in $(find /sys/kernel/iommu_groups/* -maxdepth 0 -type d | sort -V); do echo "IOMMU Group ${g##*/}:"; for d in $(ls -1 $g/devices); do lspci -nns $d; done; echo; done'
If every piece of hardware, or at least the pieces you need for passthrough, are in their own separate IOMMU group – you got lucky. Namely, that’s the SSD you need and the GPU you need, plus anything else you want, optionally. If not, you’ll have to apply the ACS patch (I’ll describe this once I have enough information).
As for the SSD, it might happen that, say, you have 3 SSD slots, but 2 of them are in one group and 1 is in a separate one, you already know what to do here, right?
Virtualization
YaST –> Virtualization –> Install Hypervisor and Tools - KVM server and KVM tools.
If YaST offers to create a bridge during installation, agree to it, if there’s an error – it doesn’t matter.
After installation, check:
sudo systemctl status virtqemud
And also add yourself to the groups:
sudo usermod -aG libvirt,kvm $(whoami)
This is needed so that later you can passthrough PCI devices, pin CPU cores, set up hugepages, and other stuff.
Reboot, and you can check that you’re in the group like this:
groups && grep -E 'libvirt|kvm' /etc/group
And also, for W11:
ls /usr/share/qemu/ovmf*
There should be /usr/share/qemu/ovmf-x86_64-smm-ms-code.bin, that’s SMM + Secure Boot.
Creating the virtual machine
Open Virtual Machine Manager and create a new VM, Local install media (ISO), yes, you need to have a Windows image. RAM/CPU whatever, doesn’t matter right now. Storage – this part matters, uncheck Enable storage for this VM. And it’s IMPORTANT to check Customize configuration before install.
If “Virtual Network is not active” – sudo virsh net-autostart default and click “Yes”.
Overview:
- Chipset: Q35
- Firmware:
/usr/share/qemu/ovmf-x86_64-smm-ms-code.bin
CPU:
- Copy host CPU configuration (host-passthrough)
Add Hardware –> TPM. Let’s slow down here for a second. You’ve got two options, either passthrough, or not. Are there any downsides or upsides to passing through the TPM? Well, in the day-to-day life of an average person – not really.
Passthrough is basically synonymous with exclusive access, and there’s only one TPM. Because of this, errors can start popping up, for example, you start the VM, everything works, you shut down the VM, start it again, and now it’s a coin flip:
- It’ll start
'/dev/fdset/0' is not a TPM device– can be fixed with a host reboot, not cool
You can check whether the TPM is being used by the host like this:
sudo journalctl -k -b 0 | grep -i "ima\|tpm"
If you see some activity (more than a couple of lines after the OS boots, but some usage), then it’s being used by the host.
If you’re willing to take the risk, or the TPM isn’t being used by the host, then why not:
- Type: Passthrough
- Model: CRB (2.0 only) / TIS
- Version: CRB - 2.0 / TIS - 2.0/1.2
If not, it’s better to emulate it:
- Type: Emulated
- Model: if TPM 2.0 support is available - CRB, otherwise - TIS
- Version: CRB - 2.0 / TIS - 2.0/1.2
If you have two TPMs in the list, delete the one you didn’t create.
Disk passthrough
There are two ways to passthrough a disk. The universal one, and, if you got lucky with IOMMU groups – VFIO.
Check the IOMMU groups:
sh -c 'for g in $(find /sys/kernel/iommu_groups/* -maxdepth 0 -type d | sort -V); do echo "IOMMU Group ${g##*/}:"; for d in $(ls -1 $g/devices); do lspci -nns $d; done; echo; done'
If you see something like this:
| |
Or something like this:
| |
And that’s it, if there’s NOTHING else in that group, you got very lucky, you can passthrough the disk in the most direct way.
In the first case, the disk’s bridge is in the group together with the disk itself, that’s totally fine to passthrough, but if, say, there’s a couple of USB devices, another disk, a network card, or something else in there, then no, don’t do that.
The universal method is via the VirtIO driver, it’s not bad, but the latency is higher, you’ll lose about 3-5% of linear speed (writing/moving files), and a bit more loss on random write/read (video editing, rendering, gaming, etc.) compared to bare metal.
You can also try one method first and then the other, without recreating the VM or reinstalling Windows, both will work.
Let’s do it:
lsblk -o NAME,SIZE,TYPE,MOUNTPOINT,MODEL
Output:
| |
Check that this is the disk you need and that it has no mount points.
Next:
ls -la /dev/disk/by-id/ | grep nvme1n1
We need something like nvme-KINGSTON_SKC3000D2048G_xxxx, without _x or -x. Write this down.
This is how we find the disk’s serial number, needed to bind the disk by serial (VirtIO) rather than by name. In Linux, whichever disk gets initialized first becomes that one. This means that what you specify in the VM settings can change after the host reboots, it won’t change if you use the serial number.
VirtIO (universal)
Download the virtio-win driver. It’s needed so Windows can see your disk.
Go to Add Hardware –> Storage:
- Select or create custom storage
- Device type: Disk device
- Bus type: VirtIO
- Manage –>
/dev/disk/by-id/nvme-KINGSTON_SKC3000D2048G_xxxx(see above) - Advanced options:
- Cache mode: none
- Discard mode: unmap
Add Hardware –> Storage again:
- Device type: CDROM
- virtio-win.iso
VFIO
If you haven’t installed Windows yet, skip this step; if you have already installed it but want VFIO, boot into Windows, open the terminal as admin:
bcdedit /set {current} safeboot minimal
Shut down the VM and delete the current VirtIO disk.
Add Hardware –> PCI Host Device, here you need to find the SSD you need, yes, it’ll be a bit of a hassle, but once you find it, click on it and Finish. From now on it will show up not as a disk, but as a “PCI ID” in the left panel, don’t lose track of it.
WARNING! This is NOT the disk’s ID, NOT its serial number, it’s the PCI slot ID.
If you move the disk to a different slot, you’ll need to add it again.
But more IMPORTANTLY, if you put a different disk in its place, it will be automatically passed through (if you haven’t done isolation – then it won’t be automatic, only when the VM starts). So if you swap it, say, with the host’s system disk, that’s going to be sad.
Before doing anything like that, remove the disk from the VM, then add it again!
Go to Boot Options and select that same “PCI ID” there. That’s it. Simple, right?
It’s a good idea to boot into safe mode when the system disk changes, the disk is the same, but for Windows it used to be Red Hat and now it isn’t Red Hat anymore – that counts as a disk change.Windows should boot into safe mode, exit safe mode:
bcdedit /deletevalue {current} safeboot
Now in Task Manager, under Performance, you’ll see your actual disk instead of some Red Hat thing.
Since we didn’t do isolation, the passthrough is dynamic: when the VM is off, the host sees the disk, when it’s on, the host doesn’t see the disk. There’s not much point in doing isolation, it doesn’t add anything. But if the system suddenly decides to do something with the disk right at the moment the VM starts, worst case you get a kernel panic :D
But that’s not a big deal, nothing will break. The most important thing is that the disk isn’t mounted while the VM is starting up, otherwise the filesystem could get destroyed :)
Once the disk is ALREADY in the VM, the host won’t do anything to it (unless you go around flipping the VM on/off like a light switch). If you still want to isolate it, see About VFIO Passthrough.
Here’s a small speed comparison:
- Bare metal: 6500/6300
- VirtIO: 6300/6100
- VFIO: 6420/6330
Installing Windows
At the Windows installation stage, specifically at the disk selection step, you’ll be met with horror, but don’t worry, click Load Driver –> “virtio-win\viostor\w11\amd64” and install that. And then it’s business as usual.
After installing the OS, you can remove the VirtIO & Windows ISO from the devices, you don’t need them anymore.
Peripherals – Keyboard and Mouse
Sooner or later, this will have to be solved, and properly – evdev passthrough.
Find the devices you need (you need mouse and kbd):
ls /dev/input/by-id/ | grep event
In my case that’s usb-COMPANY_USB_Device-if01-event-mouse and usb-I-CHIP_MMD_KM40_Receiver_1234-event-kbd.
You can check that it’s the right device like this:
sudo evtest /dev/input/by-id/usb-COMPANY_USB_Device-if01-event-mouse
And the same for the keyboard. Press some buttons/keys/move the mouse around, if you see a ton of log output, that’s it, that’s the one.
Add the devices to cgroup_device_acl (you’ll have to search for it and edit it, or just add your own – it’s usually all commented out by default):
sudo nano /etc/libvirt/qemu.conf
| |
sudo sh -c 'systemctl restart virtqemud && systemctl status virtqemud'
In Virtual Machine Manager –> Edit –> Preferences: Enable XML editing.
Open the VM settings, go to Overview –> XML, at the end look for </devices> and inside that tag add:
| |
Apply, the text will “disappear”, but it hasn’t actually disappeared, it just moved up higher. When the VM starts, input from the host will immediately disappear and go into the VM. To switch back, use LCtrl + RCtrl.
Media keys won’t work in the guest, to make them work you’d need to add them too, for example, mine are if01, but I don’t recommend doing that, because later on, in the audio setup section, we’ll make it nice and clean anyway.
Also note that a dongle and a USB cable are different things, if you only add one of them, the other one won’t work (depends on the device’s behavior).
Using a keyboard as an example, say you only added the dongle:
- Only the dongle is enabled – works
- Both the dongle and the cable are enabled, but the keyboard specifically switches to working over the cable – doesn’t work
- Both the dongle and the cable are enabled, but the keyboard is just charging via the cable while actually working through the dongle – works
If you decide to add both, it won’t work – if one of them is disabled, the VM will refuse to start. This is solved via udev symlinks, more on that below.
udev symlinks (merging devices into one)
I’ll show this using a keyboard as an example. Connect the keyboard through every method you want to merge, or if using one method causes the other to “drop off” and vice versa, just do what’s described below one at a time.
Check the list of devices again:
ls /dev/input/by-id/ | grep event
If you’re not sure about the device, check it:
sudo evtest /dev/input/by-id/usb-SmartCloud_MMD_KM40-event-kbd
For me, pressing regular keys doesn’t write anything to the log, while:
sudo evtest /dev/input/by-id/usb-SmartCloud_MMD_KM40-if02-event-kbd
Does write to the log. So the device we need is usb-SmartCloud_MMD_KM40-if02-event-kbd.
In my case, I end up with:
usb-I-CHIP_MMD_KM40_Receiver_1234-event-kbd– the dongleusb-SmartCloud_MMD_KM40-if02-event-kbd– the cable
Next, we do this with them:
DEV=/dev/input/by-id/usb-I-CHIP_MMD_KM40_Receiver_1234-event-kbd && echo "- Properties:" && udevadm info -q property -n "$DEV" | grep -E "ID_VENDOR_ID|ID_MODEL_ID|ID_SERIAL|ID_USB_INTERFACE_NUM|ID_INPUT" && echo "- Name:" && udevadm info -a -n "$DEV" | grep -m1 'ATTRS{name}'
DEV=/dev/input/by-id/usb-SmartCloud_MMD_KM40-if02-event-kbd && echo "- Properties:" && udevadm info -q property -n "$DEV" | grep -E "ID_VENDOR_ID|ID_MODEL_ID|ID_SERIAL|ID_USB_INTERFACE_NUM|ID_INPUT" && echo "- Name:" && udevadm info -a -n "$DEV" | grep -m1 'ATTRS{name}'
Substitute your own values into DEV, of course.
What we’re interested in:
ID_VENDOR_IDID_MODEL_IDID_USB_INTERFACE_NUMATTRS{name}– needed to avoid collisions
Next:
sudo nano /etc/udev/rules.d/99-vm-keyboard.rules
| |
Replace the values in <...> with your own. I’d also suggest adding similar comments, so you don’t get confused about what’s what.
Pay attention to link_priority, that’s the priority. When I plug my keyboard in to charge it, I obviously don’t unplug the dongle from USB.
But my keyboard isn’t dumb and starts working over the cable instead of the dongle, but the dongle is still present in the system regardless.
As a result, udev ends up using the dongle, which… doesn’t work, because the cable is plugged in. That’s why the dongle has a lower priority, and the cable has a higher one.
Apply the rules:
sudo sh -c 'udevadm control --reload-rules && udevadm trigger'
Check:
ls -l /dev/input/by-id/vm-keyboard-event-kbd
And also:
sudo evtest /dev/input/by-id/vm-keyboard-event-kbd
And press some keys, try just the dongle, just the cable, and both, everything should work.
Next, everywhere, add/replace the keyboard with /dev/input/by-id/vm-keyboard-event-kbd, as shown at the start of the section.
Pinning CPU cores & HugePages
The most interesting and simplest part. But first, a preamble.
With Intel’s f*ckton-of-cores chips, it’s not quite a f*ckton of cores. There are P-cores – performance cores, and E-cores – energy-efficient cores, performance ones are powerful, energy-efficient ones are kind of “on life support”. Take the legendary i5-14600K, for example, it has 14 cores, right? But…
6 P-cores and 8 E-cores, meaning 6 genuinely powerful cores, and 8 so-so cores. But (once again), when overclocked, the energy-efficient cores boost from 2.6 GHz to 4.0 GHz, not a huge amount, but no longer on life support. The performance cores go from 3.5 GHz to 5.3 GHz. Regardless of whether you’re overclocking or not, throw the powerful cores + their threads into the VM, and leave the host all the energy-efficient ones. That’s it.
With AMD it’s simpler, they don’t have the concept of energy-efficient cores. You won’t have to detect P and E cores, you’ll only need to match cores to threads, and with AMD, especially with Zen 4 (AM5 socket), figuring out which thread belongs to which core is a piece of cake. But (once again), there are exceptions, with the f*ckton-of-cores AMD chips, 12-16 cores like the R 9, the cores are split across two chiplets, and, well… it’s better not to throw a bunch of cores from one chiplet plus a bunch from the other into the VM, better to use only one chiplet.
lscpu -e=CORE,CPU,CLUSTER,SOCKET,MINMHZ,MAXMHZ,MHZ
- CORE – core
- CPU – thread
- CLUSTER – chiplet
I don’t have an R 9, so I can’t show and describe exactly how to handle that, I just have a Ryzen on AM5:
| |
From 0 to 7, I have 8 cores, but as usual with this kind of thing – the counting starts not at 1, but at zero, meaning 0-7 = 1-8 cores = 8 cores.
You need to find matches, for example CORE 0, we see that in the right column, opposite 0, there’s 0 and 8, these are twins, meaning it’s one single core with two threads (because of SMT/HT). Next, the second core (marked as 1) has 1 and 9. So I found 2 cores and their 2 threads, meaning 4 threads total, which I’ll give to the host:
- 0,8
- 1,9
The rest (12 of them) will go to the VM:
- 2,10
- 3,11
- 4,12
- 5,13
- 6,14
- 7,15
See? With AMD with a single chiplet, it’s all pretty simple!
God bless the QEMU dispatcher.
We create the dispatcher, a really handy and universal thing, it can also come in useful later for hooks of other VMs:
sudo nano /etc/libvirt/hooks/qemu
dispatcher.sh
Loading file...Create the hook directories:
VM="win11"; sudo mkdir -p /etc/libvirt/hooks/qemu.d/"$VM"/prepare/begin/ /etc/libvirt/hooks/qemu.d/"$VM"/release/end/
Where win11 is the name of your virtual machine, you can find it out with sudo virsh list --all.
The hook for when the VM starts:
sudo nano /etc/libvirt/hooks/qemu.d/win11/prepare/begin/50-cpu-pinning-and-hugepages.sh
50-cpu-pinning-and-hugepages.sh
Loading file...The hook for when the VM shuts down:
sudo nano /etc/libvirt/hooks/qemu.d/win11/release/end/50-cpu-pinning-and-hugepages.sh
50-cpu-pinning-and-hugepages.sh
Loading file...Don’t forget to change the core threads in the scripts and set up hugepages to however much you need. There will also be additional information about hugepages further on, along with a table of examples.
Grant execution permissions:
sudo chmod +x /etc/libvirt/hooks/qemu
And for the hooks:
VM="win11"; sudo find /etc/libvirt/hooks/qemu.d/"$VM" -type f -name '*.sh' \( -path '*/prepare/begin/*' -o -path '*/prepare/end/*' -o -path '*/release/begin/*' -o -path '*/release/end/*' \) -exec chmod +x {} +
Restart the service to refresh the hooks:
sudo sh -c 'systemctl restart virtqemud && systemctl status virtqemud'
In my case that’s 6 cores with SMT, meaning 12 threads. In the VM settings –> CPUs, set Cores to the number of cores (6 in my case), and set Threads to the number of threads per core (2 in my case), then apply. Sockets is the number of processors, set it to 1.
In the VM settings, Overview - XML, look for <vcpu placement="static">X</vcpu>, where X is some total number of threads. Enter the value you need:
| |
Here cpuset is the core of your processor, and vcpu is the thread inside the VM, 12 virtual threads means 0 to 11, on the right I’m assigning them the REAL threads from the host. You need to assign a virtual pair to a real pair (see above).
emulatorpin tells the host to use these cores for “keeping” KVM alive, meaning in my case it lists the cores I left for the host – the first 2 cores (4 threads), so that the VM doesn’t reach into the cores allocated to the guest, well, or at least it shouldn’t.
If you passed through the disk via VirtIO, and not VFIO, then after <emulatorpin/> add:
| |
HugePages need to be added into the XML right after the <currentMemory> tag:
| |
And also change:
| |
Where X is – GB * 1048576, for example 42 GB * 1048576 = 44040192 KiB. You need to specify this very precisely.
Examples:
| GB | TARGET (hook) | KiB (XML) |
|---|---|---|
| 8 | 4096 | 8388608 |
| 16 | 8192 | 16777216 |
| 24 | 12288 | 25165824 |
| 32 | 16384 | 33554432 |
| 42 | 21504 | 44040192 |
| 48 | 24576 | 50331648 |
Regarding memoryBacking (size="2") and hugepages-2048kB, the page size matters, the absolute best option is 1024 and hugepages-1048576kB — 1gb, but it’s like disk fragmentation. It’ll (probably very) likely be problematic for the host to find the amount of memory it needs in 1 contiguous gigabyte chunks, because RAM isn’t linear. But the latency will get even lower. 2mb is a compromise. Important: you can’t go lower, you can’t go higher, only 4kb (the system default), 2mb, and 1024mb (1gb) work, and that’s it.
You can also check that hugepages have been allocated (after starting the VM) like this:
cat /proc/meminfo | grep Huge
dGPU passthrough
There are two options. The blunt one, but 100% reliable, requires a reboot to “switch modes”. And the elegant one, but it might not work. The elegant option is hot-switching: start the VM – the dGPU flies off into the VM, shut down the VM – the dGPU comes back to the host, f*cking insane. But it’s complicated. It might work right now, but stop working later. If the elegant method stops working for me, I’ll definitely update the text, but if it stops for you… well, that’s kind of on you, I’m not you, I don’t know what you’ve got.
Right at the start, FIRST THING! Enable the ssh server, in case something goes wrong, the image disappears, or something else – you could log in from your phone and fix the problem:
sudo sh -c 'systemctl enable --now sshd && firewall-cmd --permanent --add-service=ssh && firewall-cmd --reload && systemctl status sshd'
Once you’re done with everything, you can (and it’s better, if you don’t need it) disable the ssh server:
sudo sh -c 'systemctl disable --now sshd && firewall-cmd --permanent --remove-service=ssh && firewall-cmd --reload && systemctl status sshd'
Log out and on the login screen select Wayland.
Now let’s make Wayland work with the iGPU, otherwise the display might disappear after passing through the dGPU.
Find the iGPU’s PCI address in decimal (hex to decimal):
lspci -D | grep -E "VGA|3D|Display" | grep -v "NVIDIA" | awk -F'[:. ]' '{printf "\n%s:%s:%s.%s (hex) => PCI:%d:%d:%d (decimal)\n\n", $1, $2, $3, $4, strtonum("0x"$2), strtonum("0x"$3), strtonum("0x"$4)}'
Output:
0000:11:00.0 (hex) => PCI:17:0:0 (decimal)
For AMD:
| |
sudo zypper install xf86-video-amdgpu
For Intel:
| |
If Driver “modesetting” didn’t work, and you’re using “intel”, then:
sudo zypper install xf86-video-intel
Keep in mind that “xf86-video-intel” isn’t updated anymore and doesn’t work that great on Intel >=11th gen, and in any case – it’s preferable to use Driver “modesetting” for Intel.
If you forgot the PCI address:
lspci | grep -E "VGA|3D|Display"
Output:
01:00.0 VGA compatible controller: NVIDIA Corporation AD104 [GeForce RTX 4070] (rev a1)
11:00.0 VGA compatible controller: Advanced Micro Devices, Inc. [AMD/ATI] Raphael (rev c5)
This time we just need 11:00.0. Next, let’s find the DRM device by PCI address:
ls -la /dev/dri/by-path/ | grep "11:00.0"
Output:
lrwxrwxrwx. 1 root root   8 Jun 15 13:11 pci-0000:11:00.0-card -> ../card0
lrwxrwxrwx. 1 root root  13 Jun 15 13:11 pci-0000:11:00.0-render -> ../renderD128
Pass the device to KWin – pci-0000:11:00.0-card :
mkdir -p ~/.config/systemd/user/plasma-kwin_wayland.service.d
| |
sudo nano /etc/environment
| |
Note the \, that’s escaping the :, it has to be like that.
systemctl --user daemon-reload
If you’re planning to do hot passthrough – I recommend reading about cold passthrough first, the knowledge will help you.
NVIDIA (Cold passthrough; VFIO from boot)
sudo nano /etc/modprobe.d/vfio.conf
There:
install vfio-pci /sbin/vfio-pci-override.sh
Next:
lspci -nnk | grep -A3 -i nvidia
| |
Write down 01:00.0 and 01:00.1.
sudo nano /sbin/vfio-pci-override.sh
| |
To what you wrote down earlier, add 0000: – 0000:<your_value> (like in the script). Make the script executable:
sudo chmod +x /sbin/vfio-pci-override.sh
Next:
sudo nano /etc/dracut.conf.d/vfio.conf
| |
Rebuild initramfs:
sudo sdbootutil --no-reuse-initrd add-all-kernels
YaST –> System –> Boot Loader –> Kernel Parameters, at the end:
| |
Reboot. Check:
lspci -nnk | grep -A3 -i nvidia
It should say Kernel driver in use: vfio-pci:
| |
In the VM settings, add a new PCI Host Device (the dGPU and its Audio device) the same way we did with the disk, and in the same place remove the Spice Display and then the Video <X> device (for example Video Virtio or Video QXL).
Otherwise Windows will detect “that” display and treat it as a second/third… display, you get the idea, it’ll just get in the way basically.
NVIDIA (Hot passthrough)
I did this with the proprietary NVIDIA driver, for the non-proprietary driver you’ll need to tweak the scripts a bit. As far as I’m concerned, an NVIDIA GPU without the proprietary drivers is useless. So that’s just how it is.
Let’s make KWin work with the iGPU, so that later it lets go of the dGPU.
mkdir -p ~/.config/environment.d
Specify the iGPU’s PCI address (lspci | grep -E "VGA|3D|Display"):
| |
systemctl --user daemon-reload
Reboot.
You can check with this command using the iGPU’s PCI address:
sudo lsof /dev/dri/by-path/pci-0000:11:00.0-card | grep kwin
There should be something there. And with the dGPU’s PCI address:
sudo lsof /dev/dri/by-path/pci-0000:01:00.0-card | grep kwin
This should be empty. WARNINGs don’t count.
Also, an extra check if you have NVIDIA:
sudo lsof /dev/nvidia* /dev/dri/by-path/pci-0000:01:00.0*
This one should really be empty. But if there’s something there, and it’s not something system-related like KWin, that’s not scary, a hook or your own hands can just kill the process and that’s it. But if it’s KWin, that won’t fly.
We already set up the hook structure and dispatcher above in Pinning CPU cores & HugePages, if you skipped that, go do it and come back here.
Don’t forget to change the PCI addresses in the scripts to your own.
sudo nano /etc/libvirt/hooks/qemu.d/win11/prepare/begin/10-dgpu-nvidia-detach.sh
detach.sh
Loading file...sudo nano /etc/libvirt/hooks/qemu.d/win11/release/end/90-dgpu-nvidia-attach.sh
attach.sh
Loading file...Make the hooks executable:
VM="win11"; sudo find /etc/libvirt/hooks/qemu.d/"$VM" -type f -name '*.sh' \( -path '*/prepare/begin/*' -o -path '*/prepare/end/*' -o -path '*/release/begin/*' -o -path '*/release/end/*' \) -exec chmod +x {} +
Where win11 is the name of your VM.
(KDE), in case you don’t have KDE at all, nothing will happen. If KDE is present but you’re not using KDE, then something will happen, something you probably don’t need.Restart the service to refresh the hooks:
sudo sh -c 'systemctl restart virtqemud && systemctl status virtqemud'
There’s a non-obvious little problem here. If the power goes out or you decide to punch the shutdown button on your PC while the VM is running, the shutdown script won’t execute. And starting the VM again won’t succeed, because there’ll be nothing to unload. In that case you’ll need to run the “on shutdown” script manually, nothing special about that.
The last step – look at the very end of the chapter above (about adding the PCI dGPU and removing the other devices).
Peripherals – Audio
Everything works, but there’s no sound, let’s fix that. This will also work for a microphone.
We’ll use “PulseAudio (on PipeWire 1.6.7)” as an example – meaning it’s actually PipeWire, with PulseAudio there for compatibility. You can find out what you have with pactl info.
sudo zypper in -y qemu-audio-pa qemu-audio-pipewire
You can check with:
qemu-system-x86_64 -audiodev help
pa and pipewire should show up.
If everything’s fine, restart the service:
sudo sh -c 'systemctl restart virtqemud && systemctl status virtqemud'
Create the configuration:
mkdir -p ~/.config/pipewire/pipewire-pulse.conf.d
| |
Restart the pipewire service:
systemctl --user restart pipewire-pulse
Check:
ss -tlnp | grep 4713 && pactl --server=127.0.0.1:4713 info
It should look like this:
| |
In the VM settings, remove the existing “Sound X” and create a new one - ICH9. Then go to Overview and there, in the XML inside <devices>:
| |
And add <audio id="1"/> inside the <sound> tag.
Before starting the VM, you can check with this command:
sudo virsh dumpxml win11 | grep -A3 audio
This is audio mixing, adjust the sound inside the VM to your liking, as well as in the host’s mixer. And if you remember, I recommended not passing through the media keys on the keyboard, thanks to that, if you match the guest’s volume to the host’s, so they’re roughly the same, then while you’re in the guest with input capture and pressing media keys – you’ll be changing both the guest and the host at once, just like on “one single system”.
Hiding and speeding up the VM
This is basic hiding, full KVM hiding is an entire science of its own and of course involves patching QEMU and the Linux kernel, which is a lot harder and won’t be covered here, but maybe someday I’ll write about it. Speeding up refers to the so-called “Hyper-V Enlightenments” (which is closely tied to basic, but modern, hiding), so that certain things don’t trigger a heavy VM Exit into the host, and instructions instead go through as if for Hyper-V (Windows native virtualization environment).
Yeah, it might seem like a bit of a contradiction, hiding the fact of virtualization, while at the same time flat out telling the system that it’s a VM, sounds like a weird solution, but it’s basically fine.
Everything is done in the XML, I think by now you’ve already visited it plenty of times.
In <cpu> you should already have something like this:
| |
Inside <cpu> you need to add:
| |
And also replace migratable="on" with migratable="off".
If you have AMD (with SMT, and I hope you do have SMT), also add <feature policy="require" name="topoext"/>.
The <features> block should look like this:
features.xml xml
Loading file...And the <clock> block should look like this:
clock.xml xml
Loading file...Find the “uuid” tag right at the top and copy the value, also run:
sudo dmidecode -s baseboard-serial-number
And copy that value too, even if it says “Default string” :D
Insert into the XML after </cputune>:
sysinfo.xml xml
Loading file...Don’t forget to change the serial number and UUID.
Find <os> and add inside it:
| |
Also look for <interface type="network">, there change the MAC address to 00:15:5D:xx:xx:xx, where the X’s are any value, but not 00 and FF. Afterward, in the guest, you can check with ipconfig /all. 00:15:5D is the Hyper-V MAC prefix, while 52:54:00 is QEMU’s.
And remove this from <devices>:
| |
Also, right at the very end, find memballoon, and change it to this (turn it off):
| |
memballoon basically isn’t used, but it exists and makes calls, why should it make calls and potentially cause freezes if it doesn’t do anything, right? Also, in Windows, if you’ve noticed the “blnsvr.exe” process in Task Manager, you can disable the BalloonService in services, otherwise it’ll just keep running vain too.
In Task Manager it’ll still say “Virtual Machine: Yes”, that won’t go away, the goal is to make it modern and not lose performance, meaning it’s not about hiding-hiding the fact of virtualization, but making it look like “legitimate” virtualization. In the terminal – systeminfo, if at the very bottom it says “A hypervisor has been detected. Features required for Hyper-V will not be displayed.” – that means everything’s working.
This status shows up if you enable Core Isolation or WSL in the system, meaning these are completely legitimate features that trigger this status too. And the performance is better, because Windows isn’t emulating calls, but using the fast “native” Hyper-V ones.
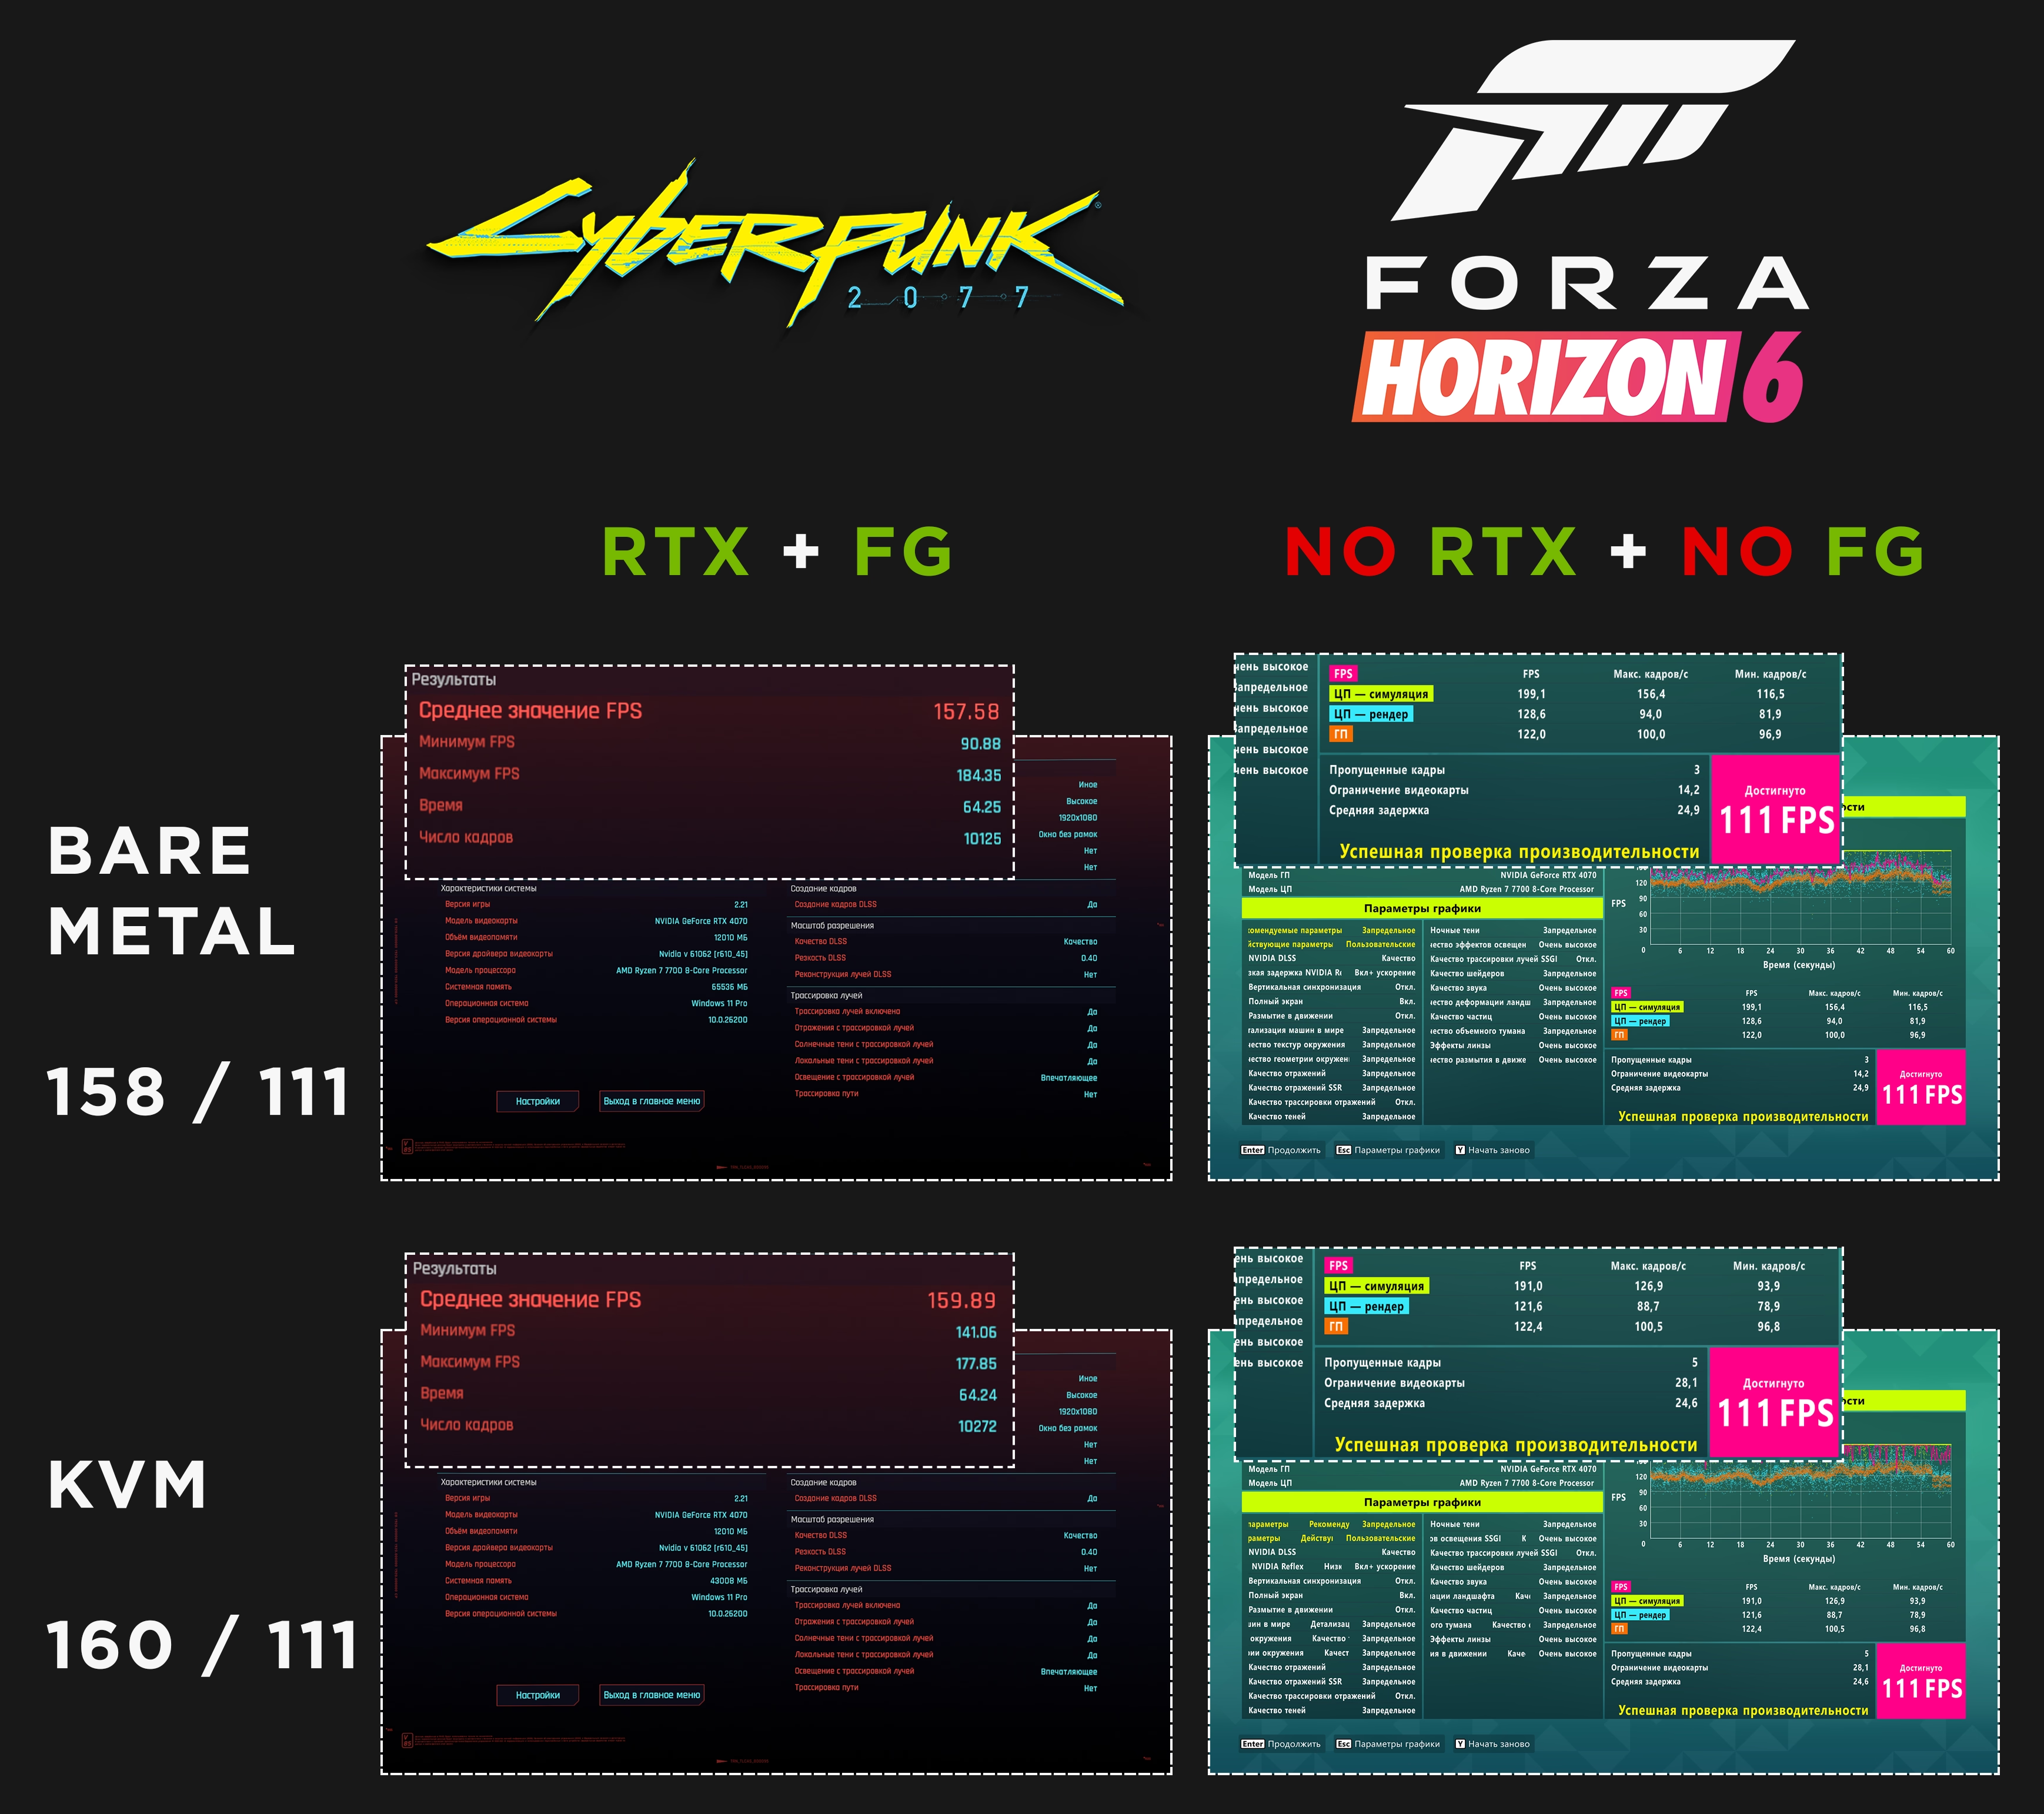
Thanks to these tweaks, my average FPS in the Cyberpunk 2077 benchmark went from 140 –> 162, while on bare metal it’s 163. That’s within the margin of error. Surprising, isn’t it?
Network setup
Just a small tweak to lock an IP address to the VM (so it doesn’t change).
In the VM settings –> NIC, and there copy the MAC address.
Next, in the main window with the list of VMs –> click on the VM –> Edit –> Connection Details –> Virtual Networks –> XML, add to the dhcp block:
| |
Apply, and in that same window click the Stop Network button, then Start Network.
You can check by typing ipconfig in a Windows terminal.
Guest additions
In Windows, you can choose whether or not to install the “Guest Additions”, you can do it right away, or skip it if you don’t need them.
This section is mainly here so I can refer to it when you need to install them, so if you ever need them, you’ll know about it.
Go to https://www.spice-space.org/download.html and in the “Windows binaries” section download and install “spice-guest-tools”.
Also go to https://fedorapeople.org/groups/virt/virtio-win/direct-downloads/stable-virtio/, download and install “virtio-win-guest-tools.exe”.
Reboot Windows, of course.
Shared clipboard and shared folders (Samba)
The most convenient convenience there is. In short, here’s what we’re going to do:
- A shared clipboard including text and images (only if MIME type is image – screenshots).
- A file share (Samba).
- A script for conveniently “copying” files to the share without wasting TBW (well, just to be safe).
Clipboard
A brief preamble. I tried the native way, tried a lot of things. Specifically through semi-spice, like spice but not spice, without graphics. But Wayland doesn’t let you read the clipboard unless the window is in focus, meaning:
copy –> click on the spice window –> paste. Inconvenient, but of course there’s a workaround with GDK_BACKEND=x11.
But that’s not the only landmine, text/plain works both ways, but without Russian text (Cyrillic). text/plain\;charset=utf=8 only works from guest to host, from host to guest see the workflow above. And of course there’s the constantly breaking desktop environment (a completely non-functional taskbar and “start” menu) because of GDK_BACKEND=x11. And a couple dozen more issues, and so…
ClipCascade
ClipCascade is a piece of software for (drumroll) sharing your clipboard over the network, and that’s it, that’s all it does. Exactly what’s needed. With this approach there’ll be a small delay in transferring clipboard data between systems, but by the time you switch input to paste, it’ll already have transferred. Without Docker it’ll be rough.
sudo zypper in docker-compose docker-compose-switch wl-clipboard
sudo systemctl enable --now docker
sudo usermod -G docker -a $USER
newgrp docker
sudo systemctl restart docker
mkdir -p ClipCascade && cd ClipCascade && nano docker-compose.yaml
| |
mkdir cc_users
docker compose up -d && docker compose logs -f
Now for the client, download the archive from the GitHub repo and unpack it wherever’s convenient.
python3 -m venv venv
source venv/bin/activate
pip install -r requirements.txt
python main.py --gui false --xmode false
--xmode false – that’s for Wayland.
It’ll ask you to log in, login:password – admin:admin123, for the rest just hit Enter (or read the text below first).
On Windows, download the .exe (portable) or .msi (installer) from https://github.com/Sathvik-Rao/ClipCascade/releases, if it’s the .exe then create a folder and put the .exe there. Authorization uses the same credentials, but Server URL: http://192.168.122.1:8080.
You don’t have to change these awesome default authorization credentials in this specific case (ONLY IN THIS CASE), because we’re routing this traffic over the host’s own network, nothing leaves your PC.
Accordingly, you can also skip encryption, it’ll work faster and more reliably.
Also, in the additional settings, you can make it so the password is saved to a file, so you won’t have to log in every time after restarting the docker container (which means after every host reboot).
If everything works, great. We just need to automate it, ClipCascade creates a DATA file, everything’s already in there, we just need to run the applications in the background.
First, Docker, technically everything’s already there, but Docker starts before libvirt, and as a result – it doesn’t start properly, because there’s no network yet. There are two options, a global one for ALL containers, or a one-off unit, I’d suggest the unit:
sudo nano /etc/systemd/system/clipcascade-server-docker.service
| |
Don’t forget to set your own paths.
sudo systemctl daemon-reload
sudo sh -c 'systemctl enable --now clipcascade-server-docker.service && systemctl status clipcascade-server-docker.service'
Next, the ClipCascade client daemon:
nano ~/.config/systemd/user/clipcascade.service
| |
%h/ = /home/username/ (only works in user services).
systemctl --user daemon-reload
systemctl --user enable --now clipcascade.service && systemctl --user status clipcascade.service
You can check the logs like this:
journalctl --user -u clipcascade.service -f
Now for Windows.
If it’s the portable version:
Just make a shortcut with ALT and drop it into WIN + R –> shell:startup.
If it’s the installer:
Don’t do anything.
Common step:
In Settings, search for Firewall –> Windows Defender Firewall –> Allow an app or feature… –> add ClipCascade.exe there. Just in case.
WIN + R –> intl.cpl –> Administrative –> Change system locale – Use Unicode UTF-8…, and reboot, otherwise without this you might not be able to copy and paste non-English text.
Alternative automation:
If you’re not happy with ClipCascade running constantly in the background on the host, since after all it’s Java, which eats on average 400-900mb of RAM just because it’s Java, you can shove the start and stop into hooks instead.
Next, you need to switch Docker to the same backend that libvirt uses on your system, in the case of openSUSE that’s nftables.
Below, wherever you see virbr0 – that’s your KVM bridge, by default (network “default”) it’s exactly “virbr0”. If you start Docker before VM/at OS boot, and then the VM itself, everything will be fine. But if you start the VM first, and then Docker, KVM networking breaks (1, 2). This is because of a conflict with other “owners” of the network rules.
What’s described below is an experimental feature in the newer Docker (>=29) (at the time of writing this text), and not all Docker features work with it, if you have a home PC and not a server that needs a 100% SLA, and you’re not using Swarm – then why not.
Change the backend:
sudo nano /etc/docker/daemon.json
Add "firewall-backend": "nftables" there.
Enable ip forwarding manually, because normally Docker does this itself, but in my case with nftables it doesn’t, so:
echo "net.ipv4.ip_forward = 1" | sudo tee /etc/sysctl.d/99-ip-forward.conf && sudo sysctl --system
sudo systemctl restart docker && docker ps && systemctl --user restart clipcascade.service && systemctl --user status clipcascade.service
Check that it’s changed:
sudo nft list tables
There should be ip docker-bridges/ip6 docker-bridges in there.
Next, disable the service/client and their autostart (if you have enabled it before):
sudo systemctl disable --now clipcascade-server-docker.service && systemctl --user disable --now clipcascade.service
And create the hooks:
sudo nano /etc/libvirt/hooks/qemu.d/win11/prepare/begin/95-clipcascade.sh
95-clipcascade.sh
Loading file...sudo nano /etc/libvirt/hooks/qemu.d/win11/release/end/95-clipcascade.sh
95-clipcascade.sh
Loading file...Make the hooks executable:
VM="win11"; sudo find /etc/libvirt/hooks/qemu.d/"$VM" -type f -name '*.sh' \( -path '*/prepare/begin/*' -o -path '*/prepare/end/*' -o -path '*/release/begin/*' -o -path '*/release/end/*' \) -exec chmod +x {} +
Where win11 is the name of your VM.
Reboot the host, just to make absolutely sure everything’s checked, start the VM, check the clipboard, then shut down the VM.
docker ps && echo && systemctl --user status clipcascade.service
Alternatives
If for some reason you don’t like ClipCascade, you can try UniClipboard or even KDE Connect, but the image clipboard might not work there, only text (as for UniClipboard – not sure, as for KDE Connect – probably won’t work).
Shared folders
Samba, of course, how else?
Create, or mentally pick, a “shared” folder, in my case ~/Public/KVM. The folder should have 755 permissions a.k.a. drwxr-xr-x, which is exactly the permissions you get by default when creating folders as your own user (not root).
Open YaST –> Network Services –> Samba Server. Yeah, you could’ve done it by hand, but YaST does it all for you, so why not.
Leave WORKGROUP as WORKGROUP, it doesn’t matter.
Start-Up:
After writing configuration: Start
After reboot: Start on boot Shares:
Add… –> Add your folder
- Share Name: Something related to the theme (mine has the same name as the folder), you’ll need this later
- Share Description: If needed
- Share Type:
- Directory, not Printer
- Share Path: pick the folder you created earlier
- Read-Only: ❌
- Inherit ACLs: ❌
- Expose Snapshots: ❌
- Utilize Btrfs Features: ❌ (this is about snapshots, apparently)
Allow Users to Share Their Directories: ❌ Don’t touch Identity, Trusted Domain, and LDAP Settings. Click OK.
Now let’s tweak the config a bit:
sudo nano /etc/samba/smb.conf
In [global]:
unix extensions = no
And in the same place, change smb3 directory leases = Yes to No.
Then find [kvm] (your Share Name) and add to that block:
| |
Where username is your username. This is so Windows creates files with the correct permissions and you can work with them freely on the host.
testparm, if everything’s ok, then everything’s ok.
Restart the service:
sudo sh -c 'systemctl restart smb nmb && systemctl status smb nmb'
Set a password for the samba user:
sudo smbpasswd -a username
Where username is once again your username.
This is needed because otherwise Windows will drive you f*cking crazy; if you feel like digging through the registry and group policies, you can skip setting a password, but then you’ll also need to enable Guest mode for your folder in samba (you can do this in YaST).
Check:
smbclient -L 127.0.0.1 -N && smbclient -L 192.168.122.1 -N
You should see something like:
| |
For both commands. And a final sanity check:
smbclient //192.168.122.1/KVM -N
Where KVM is your Share Name.
Firewall rules, just to be safe:
sudo sh -c 'firewall-cmd --zone=libvirt --add-service=samba --permanent && firewall-cmd --reload && firewall-cmd --zone=libvirt --list-services'
And if you run:
sudo ss -tlnp | grep 445
You’ll see that samba is listening on all addresses, meaning it’s accessible to other PCs on the local network, or on the internet (if you have a public IP and haven’t closed the ports on your router). If you don’t need samba for other use cases, it’s better to make it listen only on localhost and the KVM network respectively:
sudo nano /etc/samba/smb.conf
In [global]:
| |
lo– localhostvirbr0– the default (literally “default”) KVM network
testparm
sudo sh -c 'systemctl restart smb nmb && systemctl status smb && systemctl status nmb && sudo ss -tlnp | grep 445'
If you did interfaces = lo virbr0
When setting up the shared clipboard, we did this if it needed to start together with the system.
You need to tweak the samba services a bit:
sudo systemctl edit smb.service
sudo systemctl edit nmb.service
Add to both services:
| |
This is needed so samba starts strictly after the KVM network, otherwise it’ll fail because the network won’t exist yet.
For reference, here’s the catch: if you only do this for the clipboard service and start it together with the system, it’ll trigger the KVM network to start, which means samba will work fine with interfaces = lo virbr0, but if you don’t start the clipboard service together with the system, samba won’t work without these edits. Either way, it’s better to add this regardless if you’re using interfaces = lo virbr0, no matter how you start the clipboard service, it’s simply more reliable.
In Windows, right-click This PC –> Map network drive –> Folder – \\192.168.122.1\KVM. Connect using different credentials, enter your username and password there, and check the box for Remember my credentials. And don’t forget the “Reconnect at sign-in” checkbox, so it connects automatically.
And check that everything works, create some files, and check the permissions on the host with ls -l.
A script for symlinks (if needed).
rl.sh
Loading file...nano ~/Scripts/rl.sh
chmod +x ~/Scripts/rl.sh
ln -s ~/Scripts/rl.sh ~/.local/bin/rl
At the start of the script, specify the paths to the folders/symlinks on the share.
To use it, just type rl, that’s the help.
rl file– create a symlink to a filerl dir/– create a symlink to a directoryrl file1 file2 dir1 dir2– create 4 symlinks. The script detects the disk on its own, if you’re creating a symlink to a file/directory located on “Disk 1”, it’ll put the symlink into “Disk 1” on the share, same goes for “Disk 2” and so on.
Regarding symlinks to directories, Windows deletes folders recursively, so when deleting directory symlinks in Windows, Windows goes inside (since it doesn’t know it’s a symlink) and deletes the contents. Windows can’t quite pull off that horror show and the folder doesn’t get deleted. Long story short, folder symlinks can only be deleted from the host.
If you’re sharing a second disk (better not do this for the system disk!), and it just doesn’t work (DENIED), and you have SELinux (at the time of writing this text, openSUSE ships with SELinux by default), don’t forget:
sudo semanage fcontext -a -t samba_share_t "/mnt/second(/.*)?"
sudo restorecon -R -v /mnt/second
You can check like this:
sudo semanage fcontext -l | grep second
Where second is your mount point. It should output samba_share_t.
Additional stuff
Hardware features
By default, hardware features are disabled for legal reasons. This doesn’t really relate to virtualization topics specifically, it’s more about OS configuration. But it might happen that the VM can’t use these features if they’re not available on the host, which is why I added this, and that’s because host-passthrough is what gives the VM access to the processor’s hardware features.
You can check for hardware features:
grep -E "aes|sha" /proc/cpuinfo
You’ll get a wall of text, look for the presence of aes and sha. And also:
sudo zypper in libva-utils
vainfo
If H.264 and H.265 are missing from the list, they’re disabled and you should enable them.
sudo zypper in opi
opi codecs
And agree to everything along the way. If everything stalls partway through and you see a 403 error, dust off your VPN, friends, and try again (whatever’s already installed won’t get installed again).
For future reference, when updating the system with zypper dup, if you get errors with packages, since openSUSE might have updated them while the packman side hasn’t yet, choose the option along the lines of “keep old versions” and just try again in a couple of days, otherwise you’ll lose the codecs.
Check again:
vainfo
And take a look at the new codecs.
You can check this in Windows too.
For the CPU:
You can check via CPU-Z, specifically “Instructions”.
For the dGPU (NVIDIA):
nvidia-smi
It should print a table. In Task Manager, under Performance –> GPU, there should be Video Encode and Decode.
Looking Glass (an alternative to switching on the monitor)
LookingGlass – an alternative to physically switching the video output on the monitor, it adds more latency and puts more load on the system, but it’s convenient for work or light games like Kenshi or Sims. Well, more precisely, nothing stops you from using LG for anything you want, but the native image straight from the GPU will always be better.
The obvious upside is that it’s a window that exists on the host, meaning you’ll still have access to the host’s monitor(s), and at the same time you’ll be able to freely resize, rotate, move, and “minimize Windows”, convenient.
Haven’t we all dreamed of “minimizing” Windows at some point?
Looking Glass can also pass through keyboard, mouse, clipboard, and audio, which is pretty convenient. But that works via spice, which is pretty inconvenient, well, on Wayland. So, given that I already showed how to set all of that up separately – we’ll set up LG just to look at Windows, nothing more.
For the guest you need the virtio drivers, see here.
You need to install some packages, but since one of the packages is a kmp, it’s ideally best to first update the whole system with sudo zypper dup and reboot the PC. Otherwise it might update the Linux kernel as a dependency without updating everything else, which isn’t great.
Packages:
sudo zypper install looking-glass-client looking-glass-kvmfr-kmp-default
Looking Glass can’t handle more than 1 monitor, and Looking Glass will capture whichever one is the PRIMARY one in the guest. Meaning, the size needs to be calculated based on the monitor that’s going to be captured.
The math is as follows:
$$ ((width \times height) \times (pixel\_size \times 2) \div 1024 \div 1024) + 10 \ MiB $$
That’s the frame size in MiB + a 10 MiB overhead for service data, and this needs to be rounded up to the nearest power of two.
For SDR (32-bit) pixel_size = 4, for HDR (64-bit) it’s = 8.
For example, FULLHD SDR:
$$ ((1920 \times 1080) \times (4 \times 2) \div 1024 \div 1024) + 10 = 25.8 \approx 32 \ MiB $$
Step by step
- $\ 1920 \times 1080 = 2073600$
- $\ 2073600 \times 8 = 16588800$
- $\ 16588800 \div 1024 = 16200$
- $\ 16200 \div 1024 = 15.8203125$
- $\ 15.8203125 + 10 = 25.8203125$
- $\ 25.8203125 \to 2^{\lceil \log_2 25.8203125 \rceil} = 32$
| Resolution | Frame | + 10 MiB | Rounded to power of 2 |
|---|---|---|---|
| 1920×1080 | 15.8 MiB | 25.8 MiB | 32 MiB |
| 2560×1440 | 28.1 MiB | 38.1 MiB | 64 MiB |
| 3440×1440 (ultrawide) | 37.8 MiB | 47.8 MiB | 64 MiB |
| 3840×2160 (4K) | 63.3 MiB | 73.3 MiB | 128 MiB |
If you’re not a minimalist, you don’t have a super-duper 32k TV, and you don’t want to bother with the math – just set it to 256 MiB.
Configuring the module:
echo "options kvmfr static_size_mb=32" | sudo tee /etc/modprobe.d/kvmfr.conf
Where 32 is that same size in MiB.
echo kvmfr | sudo tee /etc/modules-load.d/kvmfr.conf
sudo modprobe kvmfr
Check:
ls -la /dev/kvmfr0
udev (access permissions):
sudo nano /etc/udev/rules.d/71-kvmfr.rules
SUBSYSTEM=="kvmfr", GROUP="kvm", MODE="0660"
sudo sh -c 'udevadm control --reload-rules && udevadm trigger'
In /etc/libvirt/qemu.conf add "/dev/kvmfr0" in cgroup_device_acl.
Restart the service:
sudo sh -c 'systemctl restart virtqemud && systemctl status virtqemud'
Next:
sudo EDITOR=nano virsh edit <your_vm_name>
There, right at the start:
| |
And at the very end, after the closing </devices>, but before the closing </domain>, add:
| |
33554432 – that’s 32 MiB, but in bytes, $32 \times 1024 \times 1024$.
Check:
sudo virsh dumpxml <your_vm_name> | grep -A6 "qemu:commandline"
Let me explain “why is that”. Virtual Machine Manager (GUI) simply won’t let you edit/add these parameters, they just get deleted when saving.
But, if you add them via virsh edit, and afterward change some other XML through Virtual Machine Manager – it won’t get deleted anymore.
Now the config:
mkdir -p ~/.config/looking-glass && nano ~/.config/looking-glass/client.ini
| |
I also recommend:
| |
The most important one is escapeKey, the cursor setting is optional. Do you have a Scroll Lock key? Have you ever even heard of it? Well, in LG that key is the modifier by default, the setting above changes it, hold it down and you’ll see a menu + you can also check here.
If you launch LG right now, you’ll get an error saying the Host application (on the guest) isn’t running, if that happens, that’s good, it means it’s working correctly so far.
On Windows, download the Windows Host Binary here https://looking-glass.io/downloads and install it.
Permission denied
If, when starting the VM, you get ...can't open backing store /dev/kvmfr0 for guest RAM: Permission denied, that’s probably SELinux, since it’s enabled by default on openSUSE.
I don’t recommend disabling it, but just to be sure:
sudo getenforce
Or check the parameter globally with grep '^SELINUX=' /etc/selinux/config.
If it says Enforcing – that means it’s enabled. Run:
sudo setenforce 0
This switches it to permissive, try starting the VM again. If it worked, that was because of SELinux.
If that’s the case: first, switch it back:
sudo setenforce 1
Next:
sudo sh -c 'semanage fcontext -a -t svirt_image_t '/dev/kvmfr0' && restorecon -v /dev/kvmfr0'
Check:
ls -Z /dev/kvmfr0
It should say svirt_image_t.
And also:
sudo nano /etc/udev/rules.d/71-kvmfr.rules
Add to the end there:
...MODE="0660", RUN+="/usr/sbin/restorecon %E{DEVNAME}"
sudo sh -c 'udevadm control --reload-rules && sudo rmmod kvmfr && sudo modprobe kvmfr && ls -Z /dev/kvmfr0'
Right off the bat with Looking Glass you’ll probably get a blurry mess, to avoid that the LG window needs to be opened fullscreen, and I mean truly fully full screen, the way games usually open, for example.
Or, if you want to experience some unreal WM zen, like on Niri, for example, run niri msg windows, find the size of the LG window there, and using NVIDIA, AMD, or Intel, create a custom monitor resolution. Whew! How stylish is that :D
VFIO switching script (Cold passthrough)
Put the script and configs somewhere, for example:
mkdir -p /home/$USER/Scripts/vfiopt
Create the script and configs with the content you need (see dGPU Passthrough):
touch /home/$USER/Scripts/vfiopt/vfiopt.sh /home/$USER/Scripts/vfiopt/modprobe-vfio.conf /home/$USER/Scripts/vfiopt/dracut-vfio.conf /home/$USER/Scripts/vfiopt/vfiopt.conf
(echo; head -n -0 /etc/{modprobe,dracut.conf}.d/vfio.conf; echo)
Also, in nano /home/$USER/Scripts/vfiopt/vfiopt.conf, specify the PCI address of the dGPU and its audio device:
| |
The script itself:
sudo nano /home/$USER/Scripts/vfiopt/vfiopt.sh
vfiopt.sh
Loading file...sudo chmod 755 /home/$USER/Scripts/vfiopt/vfiopt.sh
Create a symlink:
sudo ln -s /home/$USER/Scripts/vfiopt/vfiopt.sh /usr/local/bin/vfiopt
Restart the terminal. And you can run the script from anywhere:
vfiopt
About VFIO passthrough
As you might have noticed in /sbin/vfio-pci-override.sh:
| |
There’s this line, and you can add not just the GPU to it, but anything at all, like:
| |
And all of that will get passed through via vfio.
Passing GPU temperatures from guest to host
For the guest you need the virtio drivers, see here.
You might not need this at all, but for those who do, I’ll show it, also keep in mind that the main use case for passing through temperatures is needed if you have hot passthrough, if you have cold passthrough, then the python script I’m providing can be greatly simplified.
Personally, the built-in «Smart Fan» in the BIOS isn’t enough for me, which is why I prefer to control the CPU and case fans based on the CPU and GPU temperature by “MAX”. That is, if the CPU is heating up, that’s one curve, if it’s the GPU card, that’s a different curve.
Accordingly, when the GPU is passed through to the guest, its temperatures aren’t available on the host, and the guest doesn’t have access to the case fans. Also, further on, I’ll show my example of how to do this with CoolerControl.
The text below is EXCLUSIVELY for NVIDIA GPUs.
Proprietary NVIDIA drivers are required both on the host and the guest, since we’re going to use nvidia-smi –> NVML.
nvidia-smi is the official utility that wraps NVML, which is part of the proprietary NVIDIA driver, and we’re going to use NVML directly.
So, let’s begin.
In the VM settings, Add hardware –> Channel:
- Name: org.local.gpu-temp
- Device Type: UNIX socket (unix)
- Auto socket: ✅
Run VM. On the host:
sudo virsh dumpxml win11 | grep -B2 -A2 "org.local.gpu-temp"
Where win11 is the name of your VM. Output:
| |
Here we need the path – /run/libvirt/qemu/channel/2-win11/org.local.gpu-temp – remember this path, you might need it in the Python script. VM can now be shut down for further testing.
Add yourself to the group sudo usermod -aG qemu $USER (just in case) and reboot.
Create the python script:
sudo mkdir -p /usr/local/sbin/gpu-temp-bridge
sudo nano /usr/local/sbin/gpu-temp-bridge/gpu-temp-bridge.py
gpu-temp-bridge.py
Loading file...Don’t forget to change the VM name, the socket path (if it’s different), and the dGPU’s PCI address to your own.
.so-1 –> .so-2, keep that in mind.The python script grabs the temperature from the host, but if the sensor is unavailable, it grabs the temperature from the guest’s socket instead. If for some reason nothing is available, it falls back to the temperature set in FALLBACK_TEMP,
This isn’t a huge deal – 50 is neither too much nor too little, but of course it’s better to set your own individual value – your GPU’s idle temperature. but that might seem unsafe. And it is, sort of, but not really.
About it being unsafe: it’s unsafe for the GPU only if you want to control the GPU’s own fans. But if you want to control the GPU’s fans, then you don’t need to pass the temperature through to the host, the host already has full access to the dGPU whenever the VM isn’t running.
Exactly the same way the guest has full access to the dGPU whenever the VM is running. Meaning, the GPU’s fans should be controlled from whichever OS is currently using the card. All of this is purely so you can control any other fans based on the GPU temperature.
In other words, both the host and the guest can control the GPU’s own fans while they’re using the GPU, but only the host can control all the other fans.
A quick check, just run the script:
python3 /usr/local/sbin/gpu-temp-bridge/gpu-temp-bridge.py
And in second terminal:
watch -n 1 cat /dev/shm/gpu-temp
You should see a temperature. Put some load on the GPU somehow, for example:
sudo zypper in glmark2
That’s a super lightweight benchmark, then run it through the dGPU:
__NV_PRIME_RENDER_OFFLOAD=1 __GLX_VENDOR_LIBRARY_NAME=nvidia glmark2
Does the temperature change? If yes, great.
Now let’s start the VM.
In Windows, open powershell as admin:
| |
And confirm (Y). This is so that scripts can be run as admin.
Now create the script “gpu-temp-bridge.ps1”:
gpu-temp-bridge.ps1 powershell
Loading file...Run it, and from the guest, put some load on the GPU, if the numbers start moving on the host, everything’s working, the temperature is being passed through.
It’s better to put gpu-temp-bridge.ps1 somewhere rather than just leaving it on the “desktop”, since later we’ll create an autostart task.
Shut down the VM and let’s automate this, we’ll make a daemon and autostart.
Create the daemon:
sudo nano /etc/systemd/system/gpu-temp-bridge.service
| |
sudo rm -rf /dev/shm/gpu-temp
sudo systemctl daemon-reload
sudo sh -c 'systemctl enable --now gpu-temp-bridge.service && systemctl status gpu-temp-bridge.service'
Check the logs:
sudo journalctl -u gpu-temp-bridge.service -f
Now let’s create hooks, before and after the dGPU gets ripped out:
sudo nano /etc/libvirt/hooks/qemu.d/win11/prepare/begin/09-dgpu-bridge-stop.sh
09-dgpu-bridge-stop.sh
Loading file...sudo nano /etc/libvirt/hooks/qemu.d/win11/prepare/begin/11-dgpu-bridge-start.sh
11-dgpu-bridge-start.sh
Loading file...And just in case (to be extra sure):
sudo nano /etc/libvirt/hooks/qemu.d/win11/release/end/11-dgpu-bridge-restart.sh
91-dgpu-bridge-restart.sh
Loading file...Check it, start the VM, then let’s automate the powershell side.
Create a temporary .ps1 script (it’ll create the task):
| |
C:\Scripts\gpu-temp-bridge.ps1 – don’t forget to set your own path to the main script.
Run powershell as admin and start this script, then turn everything off, turn everything back on, if it all works without you lifting a finger, congratulations, you absolute nerd.
So, CoolerControl. If you click “+” and then “Custom Sensor” in the window that opens, you can select Sensor Type: File, and just point it to the path /dev/shm/gpu-temp. And you also need to disable the regular dGPU sensors there too.
But CoolerControl is still a f*ckton stubborn and will still try to use the dGPU anyway, which will result in it tragically dying at the hands of a hook. You could, of course, shove its daemon into a hook too, but that would no longer be an elegant solution, it’d be a workaround, yeah, that’s different.
sudo systemctl edit coolercontrold
Add there:
| |
Next:
sudo sh -c 'sudo systemctl daemon-reload && systemctl restart coolercontrold.service'
Also, in CoolerControl, you need to disable the dGPU sensors and run the GUI itself on the iGPU (read below – FATAL: Module X is in use).
Next, you need to make the fans show up, if they’re not there.
sudo sensors-detect
Just hit Enter for everything except the last one, “Lastly, we can probe the I2C/SMBus adapters for connected hardware…”.
And if at the end you got:
| |
That’s all thanks to Gigabyte. Since I happen to have a Gigabyte board, I’ll show how to fix that. If you don’t have Gigabyte – check this.
git clone https://github.com/frankcrawford/it87 && cd it87/
sudo zypper in dkms
sudo ./dkms-install.sh
After that, either everything’s fine, or:
| |
That’s because of Secure Boot:
sudo mokutil --import /var/lib/dkms/mok.pub
Come up with a simple password, and reboot. During boot there’ll be a MOK screen, where you need to enroll the key and enter the password you came up with. Same thing you had with the NVIDIA drivers, and probably the root password, if you have Secure Boot.
Check whether the drivers loaded:
lsmod | grep it87
If not, do everything described below:
sudo modprobe it87
If that didn’t work, then:
sudo modprobe it87 ignore_resource_conflict=1
And add the module to autoload:
echo "it87" | sudo tee /etc/modules-load.d/it87.conf
And if the previous step didn’t work without ignore_resource_conflict=1:
echo "options it87 ignore_resource_conflict=1" | sudo tee /etc/modprobe.d/it87.conf
Check:
sensors
Do you see this?
| |
Then everything’s great.
And make sure to read the readme so you know how to update it, that’s important.
If the fans aren’t controllable manually or via CoolerControl and the like, you need to go into the BIOS, into Smart Fan, and “reset” the curves there, specifically make it into ONE single point, because Smart Fan sort of overrides this. Meaning, make something like this:
| 1 | 2 | 3 | 4 | 5 | 6 | 7 | |
|---|---|---|---|---|---|---|---|
| PWM(%) | 25 | 25 | 25 | 25 | 25 | 25 | 100 |
| Temp(C) | 0 | 80 | 80 | 80 | 80 | 80 | 80 |
Where 25 is the minimum speed you want (be reasonable, don’t set it to 0) in case CoolerControl falls over, so there’s no overheating. Where 100 is just 100. Where the first Temp is always 0, and the rest are the max possible, in my case that’s 80. For example, if I set it to 90, and reboot into the BIOS again, it’ll reset back to 80.
After updating the OS (mainly the kernel), the coolers may disappear or may run in “read-only” mode, this can be fixed by reinstalling (in my case) it87:
| |
Problems
FATAL: Module X is in use
sudo lsof /dev/nvidia* /dev/dri/by-path/pci-0000:01:00.0*
Here, of course, use your own dGPU PCI address – lspci | grep -E "VGA|3D|Display".
Check what’s using the card, for example in my case, this is what often shows up:
| |
code is VSCode, which decided it just had to use the dGPU, you just need to close/kill the process and that’s it. If it’s something system-related, check the KDE Plasma section below.
What if you don’t want the application to get killed, you can just launch it on the iGPU right away. But that won’t work for VS Code, since what you launch there is a wrapper, and launching it with the right parameters won’t make VS Code itself run on the iGPU, and modifying the wrapper would just get reset by a VS Code update, so in the case of VS Code it’s simpler to just disable hardware acceleration.
For other applications, in the .desktop file:
| |
For a terminal, simply:
| |
Note that __EGL_VENDOR_LIBRARY_FILENAMES and VK_ICD_FILENAMES differ depending on the vendor, Intel/AMD/NVIDIA/something else? Some Chinese GPU brand?
Screen flickers and the VM won’t start after an OS update (KDE Plasma)
Check the dGPU’s PCI address:
sudo lsof /dev/nvidia* /dev/dri/by-path/pci-0000:01:00.0*
Here, of course, use your own dGPU PCI address – lspci | grep -E "VGA|3D|Display".
There’ll almost certainly be a bunch of stuff there, a bunch of things using your dGPU that shouldn’t be, and it’s probably something related to the desktop environment, likely KWin. And it’s not exactly using your card (cardX) itself, only EGL/OpenGL rendering, even though it technically isn’t using the card itself (it’s not outputting the image to the screen through it), which is why it seems like everything’s supposedly fine.
As a result, the hook kills KWin to detach the card, and along with it, kills itself (KVM). Because of this tragic death, KWin gets revived in an emergency, which is why the screen flickers.
Congratulations, you updated yourself right into this mess :D
Meet KWin. It’ll probably break from time to time because of updates that change its behavior (its GPU initialization logic), and the fix (possibly) will be up to you to find, by the way, while writing this text (before its first publication), I updated the system and ran into this for the first time, the fix was (as already described in the dGPU passthrough chapter) __EGL_VENDOR_LIBRARY_FILENAMES.
Welcome to the «VFIO» club, buddy!
How do you make sure it doesn’t break? You can’t, really, you can just monitor and keep an eye on the changelog. Or a more radical approach – don’t use KWin, meaning don’t use KDE Plasma. Or just don’t do hot passthrough, only cold passthrough, but if you specifically want hot passthrough for some reason, then there’s no point in cold passthrough either.
Yeah, I get that there’s an obvious contradiction here, I said we’d use this, and now I’m saying the opposite. But for a first attempt, given that this text is aimed at an audience that “kind of knows what they’re doing, but not really, but does have some experience”, my opinion is that it really is better to use something with a rich GUI, for clarity’s sake, so to speak.
Most of what’s described here will work just fine without KDE Plasma, you just ignore everything that mentions KWin (possibly X11 too, depending on your setup) and KDE Plasma respectively, but you’ll have to find an alternative for your DE/WM – “transplant” everything onto the iGPU, that’s pretty much all you need to do, and it’s not out of the question that “over there” this might even be simpler in that regard (for example, on Niri – it’s very simple).
As for me, even if I end up using a different DE/WM, I’ll try to stay on top of things and apply fixes. But I’ll add them seamlessly, meaning as if that’s how it was supposed to be from the start, but I’ll keep an update log.
VM freezes on shutdown/reboot and 100% CPU
This is an NVIDIA/AMD bug related to FLR. There’s no fix for NVIDIA. And I don’t have AMD, but for AMD, this might help.
Just do a “double” shutdown through Virtual Machine Manager. As long as it’s not force off, but an actual shutdown, it’s safe. Either shut down from within Windows + Shutdown from Virtual Machine Manager, or do shutdown twice from Virtual Machine Manager.
Or some automation like this:
| |
Yeah, obviously, this is a workaround.
How to update QEMU/KVM
For all of these steps, the VM should, of course, be turned off.
Besides the obvious zypper dup – updating the whole system, there’s this in the XML:
| |
pc-q35-10.2 <– this needs to be updated too. After updating QEMU, run:
qemu-system-x86_64 -machine help | grep q35
This will show all the versions. Take the newest one and manually change it in the XML.
But first I recommend making a backup. Backup of the XML:
sudo virsh dumpxml win11 > ~/win11.xml
Backup of the NVRAM file (if <os firmware="efi">):
sudo virsh dumpxml win11 | grep nvram
In the output:
| |
We need /var/lib/libvirt/qemu/nvram/win11_VARS.fd:
sudo cp /var/lib/libvirt/qemu/nvram/win11_VARS.fd ~/
Restore the backup:
sudo virsh define ~/win11.xml
Check:
sudo virsh dumpxml win11 | diff - ~/win11.xml
And the NVRAM:
sudo cp ~/win11_VARS.fd /var/lib/libvirt/qemu/nvram/win11_VARS.fd
Conclusion
I’m f*cking exhausted. I’m too lazy to download benchmarks and run tests, so here are some screenshots from the Cyberpunk 2077 and Forza Horizon 6 benchmarks, I don’t have any other games with a built-in benchmark, and I already ported these two anyway.

- My notes/tutorial to achieve KVM with passthrough on OpenSUSE and Ryzen/Threadripper system – Level1Techs
- Fedora 33: Ultimiate VFIO Guide for 2020/2021 [WIP] – Level1Techs
- openSUSE - Docker – openSUSE
- libvirt/QEMU Installation – Looking Glass Docs
- Tons and tons of random internet and AI